
Optimising Office Efficiency: A Guide to Setting up Meeting Rooms with Google Calendar Resources.
In today’s dynamic work environments, efficient management of meeting spaces is crucial for seamless operations. Google Calendar offers a powerful solution to streamline this process, enabling teams to effortlessly book meeting rooms and optimize office spaces. Below is a comprehensive guide to setting up Google Calendar resources for meeting room bookings in your office.
As a quick note before you get going is that if you want people to be able to book a meeting room who don’t have access to your domain (e.g. a company email alfie@companyname.com), you will need to use a meeting booking software. You can learn more here in our review of the best meeting room booking software, including our own.
Below is a video guide showing you how to set up calendars for your buildings, rooms, spaces and more. If you decide it looks a bit tricky, use the step by step guide or use the button below to speak with an expert today.
Contents
- 1 What Is a Meeting Room Booking System in Google Calendar?
- 2 How Google Calendar Handles Meeting Rooms and Resources
- 3 1: Add Buildings
- 4 2: Add audio, video, or other features
- 5 3: Add resources
- 6 4: Booking Process for Employees
- 7 5: Add a Meeting Room Booking Software for Ease of Use and Enhanced Data
- 8 6: Avoiding Scheduling Conflicts
- 9 7: Best Practices for Efficient Room Management
- 10 8: Troubleshooting and Support
- 11 Using Google Calendar as a Meeting Room Booking System
- 12 Common Issues with Google Calendar Room Booking
- 13 Limitations of Using Google Calendar Alone for Meeting Room Booking
- 14 When Do Teams Need Dedicated Meeting Room Scheduling Software?
- 15 So what next?
- 16 Conclusion
- 17 Google Calendar Meeting Room Booking FAQs
- 17.1 How do I add a meeting room to Google Calendar?
- 17.2 How do I book a meeting room in Google Calendar?
- 17.3 How can I check meeting room availability in Google Calendar?
- 17.4 Why are meeting rooms not showing in Google Calendar?
- 17.5 Can Google Calendar prevent double booking of meeting rooms?
- 17.6 Is Google Calendar enough for managing meeting rooms in hybrid offices?
- 17.7 What is the best meeting room booking system that works with Google Calendar?
- 17.8 Can Google Calendar be used for both desk booking and meeting room booking?
What Is a Meeting Room Booking System in Google Calendar?
A meeting room booking system, Google Calendar, is basically a centralized system that treats physical spaces as bookable assets. While many users think of Google Calendar as a tool used to manage individual schedules, there is a hidden back-end infrastructure built into Google Calendar designed to deal with shared resources. When you implement a Google Calendar room booking system, you are moving beyond simple invitations and into the world of resource management.

A meeting room booking system like Google Calendar helps administrators set specific attributes for all office spaces, including capacity, audio-visual equipment, and location. This converts a typical calendar used in the room into a searchable database. Instead of manually checking if a space is free, the Google meeting room booking system takes care of that by ensuring that a Google Calendar conference room can only be occupied by one group at a time.
This basic setup is the very first step for any organization wanting to get rid of the messy spreadsheets and move towards a streamlined Google Workspace room booking flow.
How Google Calendar Handles Meeting Rooms and Resources
Understanding the logic behind a room booking system, such as Google Calendar, is crucial for keeping scheduling conflicts in check. Google does not treat a room like a person, but it treats it rather as a “Resource”. This distinction is important for having an organized meeting room booking calendar.
Google Workspace Rooms as Calendar Resources
In the Google Workspace meeting rooms ecosystem, a room is a distinct entity that has its own email address. When you are using Google Calendar’s room reservation features, you are actually inviting the email addresses of the room resources to your meeting.
If the room “accepts” the invitation, it is booked. This means that one can categorize Google Workspace rooms by buildings, floors, and even features (such as “jamboard” or “video conferencing”). By placing rooms in Google Calendar as resources, organizations can make sure that every conference room calendar is monitored accurately throughout the domain.
Conference Room Calendars vs Personal Calendars
There is a fundamental difference between a conference room on Google Calendar and your personal one. A personal calendar is in charge of a person who has the authority to manually decline or accept meetings. On the other hand, Google Room Scheduler is usually configured to “auto-accept” requests as long as the slot is free.
This automation is what makes it a viable meeting room scheduler software. A conference room booking calendar is solely created to display the availability of a physical asset, which makes the Google Calendar room management process much more transparent for the entire team.
How Room Availability Works in Google Calendar
The logic of Google Calendar room availability uses a conflict-detection engine. Whenever a user tries to book a meeting room on Google Calendar, the system will automatically check the schedule of that resource. If the resource is already “attending” another event, the meeting room booking Google Calendar interface will either remove the room from the list of available rooms or mark a conflict.
This real-time check is what makes a simple app turn into a real conference room management software. By having a clear understanding that Google Calendar meeting room booking is a database query, the IT managers can better understand the issues of why certain Google Calendar rooms might not be showing up during peak hours.
How to Check Room Availability in Google Calendar
For a user to effectively utilize the meeting room booking system, he or she must know how to check room availability in Google Calendar. This is usually done using the “Rooms” tab in a calendar event. Here, the Google Calendar view room availability feature lets users filter by “Available only” so that they don’t waste time picking occupied spaces.
Furthermore, users can utilize the “Find a Time” feature to view a side-by-side comparison of guests’ schedules and the conference room booking Google Calendar. This view offers a high-level view of the Google Calendar conference room status over several hours. If a team member is wondering how to book a meeting room in Google Calendar efficiently, it is key to use these visibility tools to ensure the Google room booking system doesn’t return a “declined” notification because of a hidden conflict.

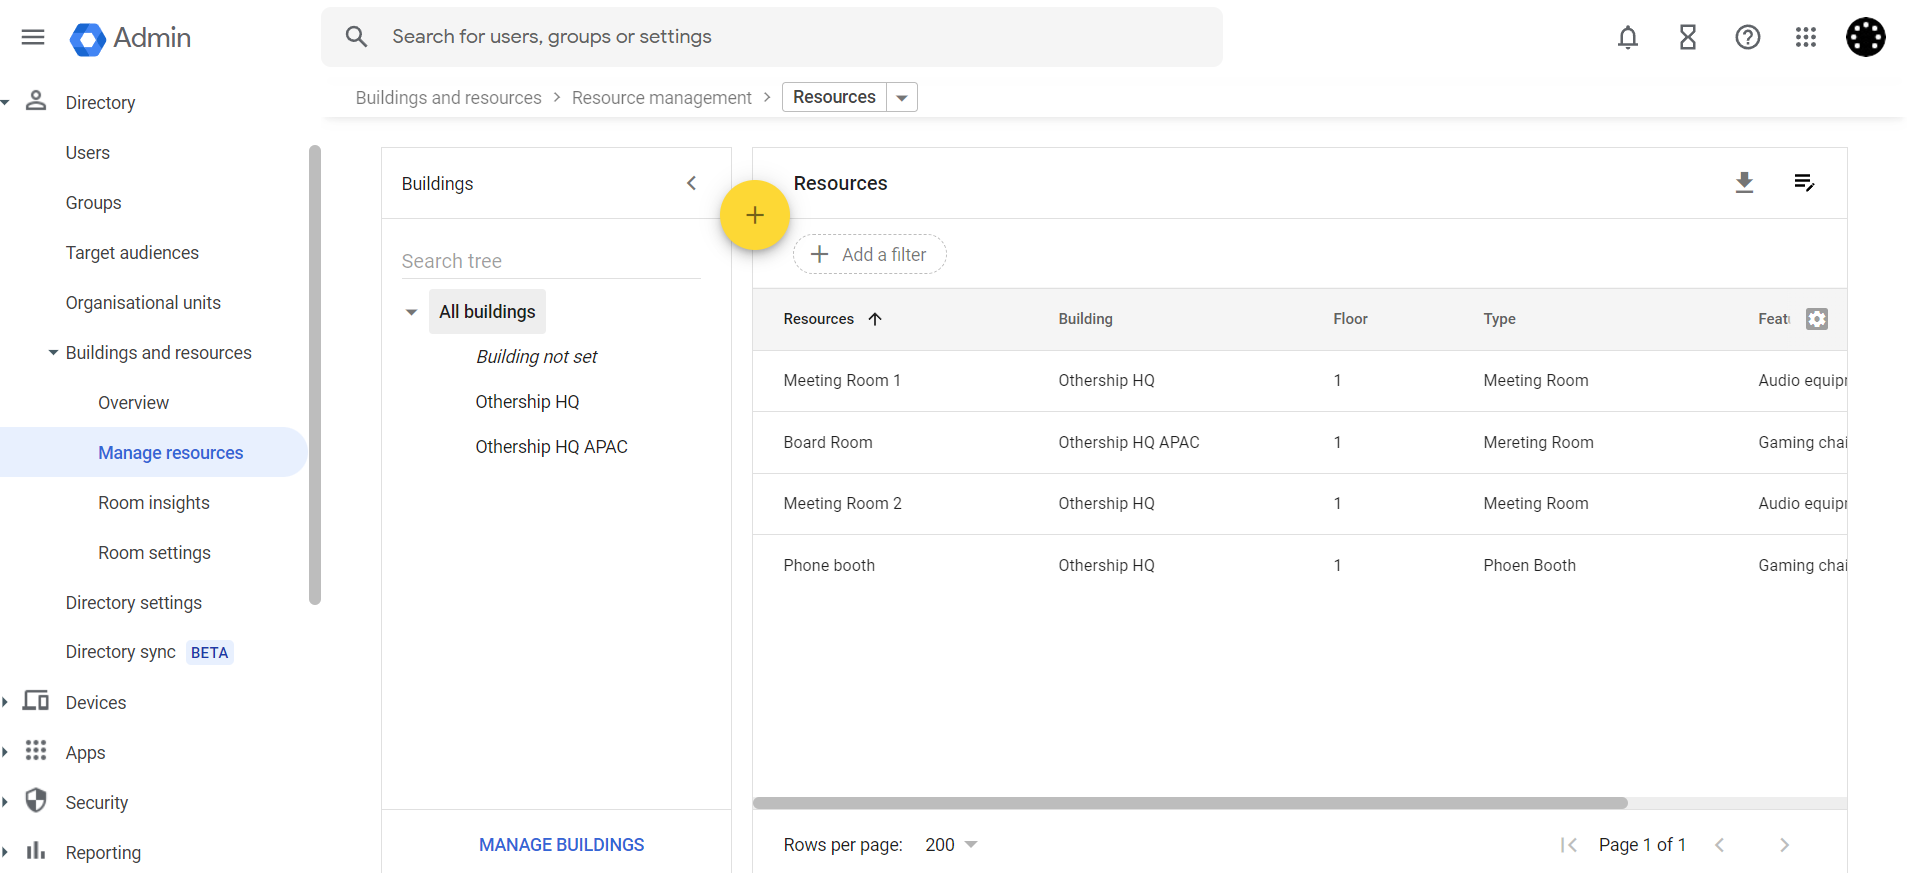
1: Add Buildings
1.1: Add buildings individually
Start by listing all the buildings in your company. Google Calendar uses buildings as the foundation for all your resources. Note you will need to have a Google Workspace account for businesses and not a personal account.
- In the Admin console, go to Menu
 DirectoryBuildings and resources.
 - In the Resource Management section, click Open.
- At the bottom of the page, click Manage Buildings.
- Point to and click Add Add new building.
- Enter the building information.To add the address:
- Click Edit Edit address.
- Enter the address information for each location using the official postal address format for its region. The Google map panel on the right shows a pin at the address. Addresses associated with a known business location will be stored using the local language. Note: Building addresses are not used for map navigation.
- If needed, drag the pin to the best or correct location. We recommend that you place the pin at the center of the building’s rooftop. The latitude and longitude fields appear.
- Click Done.
- Click Add Building.
1.2: Or to add buildings in bulk:
You can create up to 10,000 buildings for your company or in each domain. To save time, upload all or multiple buildings in your domain.
-
In the Admin console, go to Menu DirectoryBuildings and resources.
-
In the Resource management section, click Open.
-
At the bottom of the page, click Manage buildings.
- Point to Add and click Upload Bulk upload buildings.
- Click Attach CSV and follow the steps to attach the CSV file.
- Click Upload.
To view the required fields and descriptions, see below: Format for bulk updates.

2: Add audio, video, or other features
If you want people to know what equipment or other features come with a room or other resource, add them using the Admin console. For example, you might want to let people know which rooms have a Jamboard, or which company cars have a navigation system.
Note: To add features, use the Admin console to do this one by one or contact us for help doing this via API. You can’t add features by uploading feature details in a CSV file.
2.1: Add features one by one in Admin console
You can create up to 100 features for your company or in each domain.
-
In the Admin console, go to Menu DirectoryBuildings and resources.
- In the Resource management section, click Open.
- Click Manage Manage resource features.
- Click Add Feature.
- Enter the feature name and choose the type:
- Other: Not videoconferencing or telephony (for example, Whiteboard, Wheelchair accessible, or External guests)
- Videoconferencing: Video communication equipment (for example, VC or Cisco conferencing unit)
- Telephony: Audio communication equipment (for example, phone)
- Click Save.
After you add a feature, you can add it to a resource by clicking on the resource![]() Features. Users can search for and add features to the selected resource.
Features. Users can search for and add features to the selected resource.
3: Add resources
Next, add anything people can reserve: conference rooms, company cars, mother’s rooms, or whatever your company provides for workers. If you created features in step 2, you can associate them with the resources as you add them.
Note: Resources are typically available within a few minutes of being added. In some cases, however, it might take up to 24 hours for them to become available in everyone’s calendar.
3.1: Add resources one by one in the Admin console
You can add up to 10,000 resources for your company or in each domain.
- In the Admin console, go to Menu DirectoryBuildings and resources.
- In the Resource management section, click Open.
- Point to and click Add .
- Enter the resource information. Select one of these types:
- Conference room: Resources used for meetings or conferences that can be as small as a phone room.
- Other: Resources that aren’t used for meetings. For example, a bicycle or company car.
- Click Add Resources.
For details on the fields, see below: Format for bulk updates.
3.2: Or to upload resources via CSV in bulk
- Download to a CSV from the admin console.
-
In the Admin console, go to Menu DirectoryBuildings and resources
- In the Resource management section, click Open.
- Click Download .
- Save the CSV file.
-
- Import CSV information into a spreadsheet.
- Open a blank Google Sheet and go to File > Import.
- Navigate to the downloaded CSV file, and click Select.
- In the Import window, make your selections and click Import data.
- Edit resources in a spreadsheet.
- Use the spreadsheet you create in the previous steps above.
- Edit the fields as needed.Update the fields according to the tables in Format for bulk updates. Don’t modify the resource ID. If you do, a brand new resource will be created instead of updating the existing one.
- When editing is complete, save the spreadsheet as a CSV file.
- Upload a CSV after editing.
-
In the Admin console, go to Menu DirectoryBuildings and resources.
- In the Resource management section, click Open.
- Point to Add and click Upload Bulk upload resources.
- Click Attach CSV and follow the prompts to attach the CSV file.
- Click Upload.
-
4: Booking Process for Employees
- Accessing Resources: Employees can view available rooms by selecting the resource calendars option on the left sidebar of their Google Calendar interface.
- Booking Rooms: Choose the desired room, specify the meeting duration, and add any necessary details. Employees should receive a confirmation once the room is successfully booked.

5: Add a Meeting Room Booking Software for Ease of Use and Enhanced Data
- Regular Review of Bookings: Periodically review and optimise room bookings to accommodate changing office dynamics and requirements.
- Encourage Communication: Create a communication channel or guideline for employees to release or modify room bookings if they’re no longer needed.
6: Avoiding Scheduling Conflicts
- Real-Time Updates: Google Calendar automatically updates in real-time, preventing double bookings or conflicts.
- Notifications and Reminders: Set up notifications to remind attendees of scheduled meetings, reducing the chance of no-shows or misunderstandings.
7: Best Practices for Efficient Room Management
- Regular Review of Bookings: Periodically review and optimise room bookings to accommodate changing office dynamics and requirements.
- Encourage Communication: Create a communication channel or guideline for employees to release or modify room bookings if they’re no longer needed.
8: Troubleshooting and Support
- Providing Support: Establish a support system or point of contact for any booking issues or technical difficulties. Meeting room booking software providers can often do this for you as part of the package.
- Training and Guidance: Offer training sessions or documentation to familiarise employees with the room booking process and any recent updates. Again you will find meeting room booking software providers can often do this for you as part of the package.
By implementing these steps, you can effectively manage office spaces, reduce scheduling conflicts, and ensure efficient use of meeting rooms. Google Calendar’s resource booking system simplifies the process, enhancing productivity and promoting a collaborative work environment.
Utilising technology to streamline office operations is a testament to the adaptability and efficiency of modern workplaces. With a well-organised system in place, your team can focus on their tasks without worrying about the hassle of room bookings. Cheers to a more organised and productive workspace having set up Meeting Rooms with Google Calendar Resources!
Using Google Calendar as a Meeting Room Booking System
Once set up, the meeting room booking system becomes part of the day-to-day working routine of a team member. In a high-functioning office, the Google meeting room booking system is the invisible hand keeping the organization from chaos. When a user creates an event, the meeting room booking Google interface acts as a gatekeeper.

This workflow is especially good for shared teams. Because the Google Workspace meeting room booking process is integrated, anyone with the right permissions can view who has reserved a space and for how long. For recurring meetings, the Google Calendar meeting room booking logic is designed to hold that specific slot into the future.
However, using Google Calendar as a meeting room booking system requires a level of “calendar hygiene”. Hence, users need to be diligent about releasing rooms if a meeting is canceled, as the system itself does not have any way of knowing if a room is physically empty or occupied.
Common Issues with Google Calendar Room Booking
As integrated as it is, a meeting room booking system, Google Calendar, is not without its hurdles. Because it is based on a general-purpose calendar engine, it does not always have the specialized “guardrails” that are available in dedicated meeting room scheduling software.
Google Calendar Rooms Not Showing
One of the most common support tickets we get is for Google Calendar rooms that don’t appear when a user attempts to book. If an administrator has not “shared” the resource calendar with the entire organization, or if the user is looking in the wrong “Building” category, the Google Calendar room availability will be blank.
Another common reason for Google Calendar rooms not showing is that the room has hit its maximum “resource capacity” or that an admin has hidden it for maintenance. The main solution to this visibility problem is to ensure that all calendars that are for use in the room are set to “Make available for ‘Organization.”
Double Bookings and Availability Conflicts
The “ghost” double booking is a pain point of the Google Calendar room booking experience. While the system is programmed to prevent two people from booking the same conference room calendar simultaneously, conflicts still occur. This often occurs in the case of recurring events: if a room is available for 9 out of 10 weeks in a series, then Google may “accept” the series but silently “decline” the one conflicting date.
Moreover, if the Google Room scheduler is not set to “Auto-accept invitations that do not conflict,” a room could stay “available” in the search results even though someone sent an invite that is pending approval. This delay in real-time status updates is the reason why real-time and Google Calendar room reservation accuracy is a challenge for many teams, especially during busy morning hours.
Permission and Access Control Limitations
The Google Calendar room management system operates on a relatively flat permission structure. Typically, you can either see “Free/Busy” or “See all event details.” This lack of granular control means it is difficult to stop a junior staff member from accidentally bumping a board-level meeting or restricting certain high-value Google Workspace rooms to specific departments.
Without the advanced “Approval Workflows” found in the best meeting room scheduling software, the native Google Workspace meeting rooms are completely dependent on the honor system. If your office culture is not extremely disciplined, the conference room booking calendar can quickly become a source of internal frustration.
Limitations of Using Google Calendar Alone for Meeting Room Booking
While the Google Room Scheduler works well for small teams, for many organizations, there comes a point where the native tools begin to impede productivity, rather than help it. The main disadvantage of using only a meeting room booking system, such as Google Calendar, is the absence of specialized “workplace orchestration.” As organizations continue to centralize workplace systems in the cloud, broader Cloud Security principles increasingly influence how visibility, governance, and shared resource controls are structured at scale.
Google Calendar is, first of all, a time management tool and not a space management tool. This produces some important limitations:
No “No-Show” Protection: In a standard Google Calendar room booking setup, a room is still “booked” even if the meeting organizer never shows up. These “ghost meetings” can waste up to 30% of an office’s available real estate, but Google doesn’t have a way to understand physical occupancy or release the room for other people at all.
Static Resource Information: Google Calendar meeting room is a Flat Entry. If the AV equipment in a room breaks or if the furniture layout changes, there is no easy way for users to see these real-time updates in the booking interface.
Lack of Policy Enforcement: You cannot set rules in a Google Room booking system easily, e.g., “internal meetings only” for certain rooms or “maximum 2 hours per booking.” Without these guardrails, “room hogging” becomes a common cultural problem.
Zero Utilization Analytics: High-level decisions about office expansion or downsizing require data. Using Google Calendar as a meeting room booking system offers no automated reports about peak occupancy, most-used room types, or average meeting duration.
When Do Teams Need Dedicated Meeting Room Scheduling Software?
As hybrid work becomes the norm, the demands for a meeting room booking system and Google Calendar integration become more complex. Organizations typically know they need the best meeting room scheduling software when they experience one of these “scaling pains” such as the following:
1. The Rise of the Hybrid Office
In a hybrid environment, a Google Calendar room availability check isn’t enough. Employees need to know not only if a room is free or not, but also if their colleagues are actually in the office that day. Dedicated meeting room scheduling software often fills in this gap by being able to combine desk booking and Google integrations with room reservations to provide a single source of truth for “who is where.”
2. The Need for Physical Visibility
While using the digital Google meeting room application is convenient, high-traffic offices benefit immensely from Google Calendar meeting room display hardware. These are tablets placed outside of rooms that display real-time status. While this is available through third-party applications, Google Calendar by itself does not offer a professional-grade Google Calendar conference room display interface within the application.
3. Advanced Booking Requirements
If your organization needs coworking conference room booking software features, such as charging external clients for room use, or requiring catering and technical support requests during the booking process, the native Google Workspace room booking flow won’t do the job. At this point, transitioning to a specialized meeting room booking system becomes an operational necessity.
4. Desk and Space Consolidation
Modern offices are shifting away from assigned seating. If you are in the position where you have to deal with desk booking Google and your rooms, a dedicated system will give you the option of a combined floor plan view. This visual representation is so much more intuitive than a long list of Google Calendar rooms in a sidebar and scrolling through the list.
So what next?
If you know you will need a meeting room booking solution that provides a user interface, tablets to book from in the building, or external users to book then you will need a meeting room booking software on top of your calendar resources.
To find out how Othership can help, use the links below to speak to an expert or even try our Meeting Room Booking solution for free.
Conclusion
Setting up a google calendar meeting room booking system is a powerful first step to organize your work place. By taking advantage of the google workspace rooms, you can equip your team with a way to manage their time and space in a way they are familiar with. However, as your organization expands and develops hybrid work patterns, the restrictions on the native google room booking system may become evident.
When you get to the point where you need more visibility, better data and a means to manage desk booking google with your conference room google calendar, it might be time to consider a dedicated solution. A platform such as Othership takes the base you’ve created in Google and turns it into a full workplace management system.
Google Calendar Meeting Room Booking FAQs
To help you get the most out of your meeting room booking system, Google Calendar, we’ve managed to get together the most frequently asked questions around setup and troubleshooting.
How do I add a meeting room to Google Calendar?
If you are an administrator, you will first need to create the room as a “Resource” in the Google Admin Console in the Directory > Buildings and resources. Once the resource is created and shared, users can then add it to an event by selecting the “Rooms” tab from the event creation window and selecting the appropriate space from the list of Google Workspace rooms.
How do I book a meeting room in Google Calendar?
While creating a new event, click the “Add rooms” or “Rooms” button. You can then search for or browse available Google Calendar rooms. Selecting a room makes it a participant in your event. If the room is available, the Google Room Scheduler will usually automatically accept the invite and display the space as reserved in the conference room calendar.
How can I check meeting room availability in Google Calendar?
The best way is to use the “Find a Time” tab while creating an event. This enables you to see the schedules of your guests alongside the Google Calendar room availability. Alternatively, you can search for a specific calendar for a room in the “Add rooms” panel to see if it is listed as available for your chosen time slot.
Why are meeting rooms not showing in Google Calendar?
The problem of Google Calendar rooms not showing is usually one of three things: the room has not been shared properly by an admin, the room is already booked for that time, or the user is looking under the wrong building/category. Occasionally, the Google meeting room app interface also cannot be loaded properly because of browser extensions.
Can Google Calendar prevent double booking of meeting rooms?
Natively, the Google Calendar room booking system will “decline” the new meeting request if a conflict exists. However, it does not always stop a user from manually inviting a busy room, and the “declined” notification appears after the fact. For strict prevention and automated conflict resolution, many teams move towards the best meeting room scheduling software.
Is Google Calendar enough for managing meeting rooms in hybrid offices?
While it works for the basics, Google Calendar tends to fall short in hybrid environments because it doesn’t have functionality such as check-ins, “no-show” room releases, and physical Google Calendar meeting room display hardware. For offices where space is of the utmost importance, a more robust meeting room booking system is usually required.
What is the best meeting room booking system that works with Google Calendar?
The ideal meeting room booking system, Google Calendar integration, is one that stays in sync in real-time. Othership is a preferred solution for teams who require a professional layer over their Google setup, with interactive floor plans, advanced analytics, and easy Google Workspace meeting room booking sync.
Can Google Calendar be used for both desk booking and meeting room booking?
Google Calendar is not natively designed for desk booking. While you can technically create a “Resource” for every desk, it quickly gets cluttered and very difficult to manage. Most companies use a dedicated room booking system, such as Google Calendar partners like Othership, to manage both desks and rooms in the same visual interface.


You must be logged in to post a comment.